
HOW TO COLOR A COMIC IN PHOTOSHOP – Pt. 1 SCANNING AN IMAGE AND SETTING UP LAYERS
HOW TO COLOR A COMIC IN PHOTOSHOP-SCANNING AND SETTING UP LAYERS
There are probably a bunch of ways to color in Photoshop, and other comic books artists might have methods that differ from mine. But this way gives you a good result and is a good starting point for understanding the basics.
You don’t have to be a Photoshop guru to get good results either. I’m probably only utilizing .00001% of what PS can do, and I’ve been using it for a over a decade. I just use it to do what I need to get done. It’s a tool.
1) SCAN IN YOUR DRAWING.
First, get your linework in Photoshop. Scan it in at 400dpi for grayscale, or 600dpi for Black and White (your scanner software may say “Lineart”.) It depends on how well your scanner handles the art. If you scanned it in grayscale, then go to Image>Adjustments>Threshold and play with the numbers until you get some nice black lines. I usually set it around 163, but it varies either higher or lower depending on how fine your lines are.

If you scanned at 600dpi B&W, go to Image>Mode and select CMYK. (Note: You’ll have to select grayscale first to get it out of Bitmap mode. Then click Image>Mode again to select CMYK. I don’t know why we don’t have the technology to go straight from Bitmap to CMYK. Way to fail, science.)

CMYK is for print, and even though I do a webcomic, I ultimately want to go to print with it. If you’re doing an image that’s for web only you can select RGB.
At this point you should have some lineart that’s all ready to color:

NOTE: At this point go to Image>Image Size and change the resolution to 300 dpi. This will save you some computer processing time and 300dpi is good for color printing.

2) SET UP YOUR LAYERS.
I use layers as the backbone of my coloring process. Some people use channels, I think, but I never quite got the hang of that. Think of layers as transparent sheets of paper that you, well, layer over your art. That’s the simplest way to think of them. You can change what these transparent sheets do to the layers underneath. They might make everything underneath darker, or lighter, or give it a hue, etc. Here’s the bare bones of coloring a comic with flat colors.
I always want the line art to be the top layer set to multiply. Right now your lineart is your background layer. Right-click on that layer and select “LAYER FROM BACKGROUND”

This will let you move that layer to the top. In order to have the stuff you’re about to do underneath it be visible, set that layer’s blending mode to MULTIPLY. The drop-down menu just above the layers should say NORMAL right now. Click it to see the options.

At this point go ahead and lock the lineart layer. (It’s the padlock icon right above it.) This will keep you from accidentally coloring on that layer.
One more thing to do and you’ll be all ready to start coloring. It’s time to create the layer you’ll be doing your flat colors on. Go to the layer menu and create a new layer.
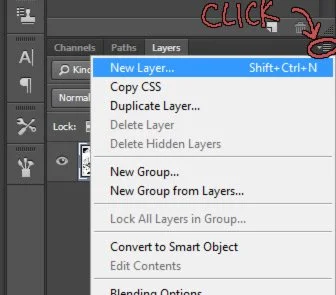
Once you do this, that layer will be on top, probably labeled “Layer 1”. Just click and drag it so it’s underneath the lineart layer.
Once that’s done your layers should look like this:

From here you’re all ready to start coloring. Next time — coloring!